Contouring is a makeup technique used to define and enhance the natural structure of the face using products that are slightly darker than your skin tone. By mimicking shadows and depth, contouring can help you achieve a more sculpted, lifted, or balanced facial appearance. It's particularly effective in defining cheekbones, slimming the nose, sharpening the jawline, or adjusting the perceived shape of the forehead. Unlike bronzing, which adds warmth and sun-kissed color, contouring focuses solely on creating dimension and structure.
What Is the Difference Between Contour and Bronzer?
Though often confused, contour and bronzer serve two different purposes in a makeup routine. Bronzer typically has warm undertones and may contain shimmer, making it ideal for mimicking the effects of sun exposure. It's applied to areas where the sun naturally hits the face: forehead, cheeks, nose, and chin.
Contour, on the other hand, is usually cool-toned or neutral and has a matte finish. It's used to mimic shadows and reduce or reshape the appearance of certain facial features. For example, contouring under the cheekbones gives the illusion of a slimmer face, while bronzing the cheekbones gives a warm, healthy glow.
What Products Can You Use for Contouring?
There are several types of products you can use to contour, and the choice depends on your skin type, skill level, and desired finish:
Cream or Stick Contours: Great for dry to normal skin types. They offer buildable pigment and are easy to blend for a natural look.
Liquid Contours: These blend seamlessly into the skin and are ideal for those who prefer a dewy, radiant finish.
Powder Contours: Best for oily skin or when layering over a set base. These offer long-lasting wear and precise application.
Concealers or Foundations (2 shades darker): An accessible way to contour without buying a separate product.
When choosing a contour product, go for one that’s one to two shades deeper than your natural skin tone and has a cool or neutral undertone to create the most realistic shadow effect.
Should You Contour Before or After Foundation?
Traditionally, contouring is done after applying foundation and concealer to ensure a smooth, even base. This method allows the contour to sit on top of the foundation and blend more evenly into the overall makeup.
However, some makeup artists and beauty enthusiasts prefer to contour before foundation in a technique called "underpainting." This method involves applying contour, highlight, and blush first, then blending foundation on top to create a softer, more diffused result.
The method you choose depends on your comfort level and desired finish. If you're new to contouring, starting after foundation might offer more control.
How to Contour Based on Your Face Shape
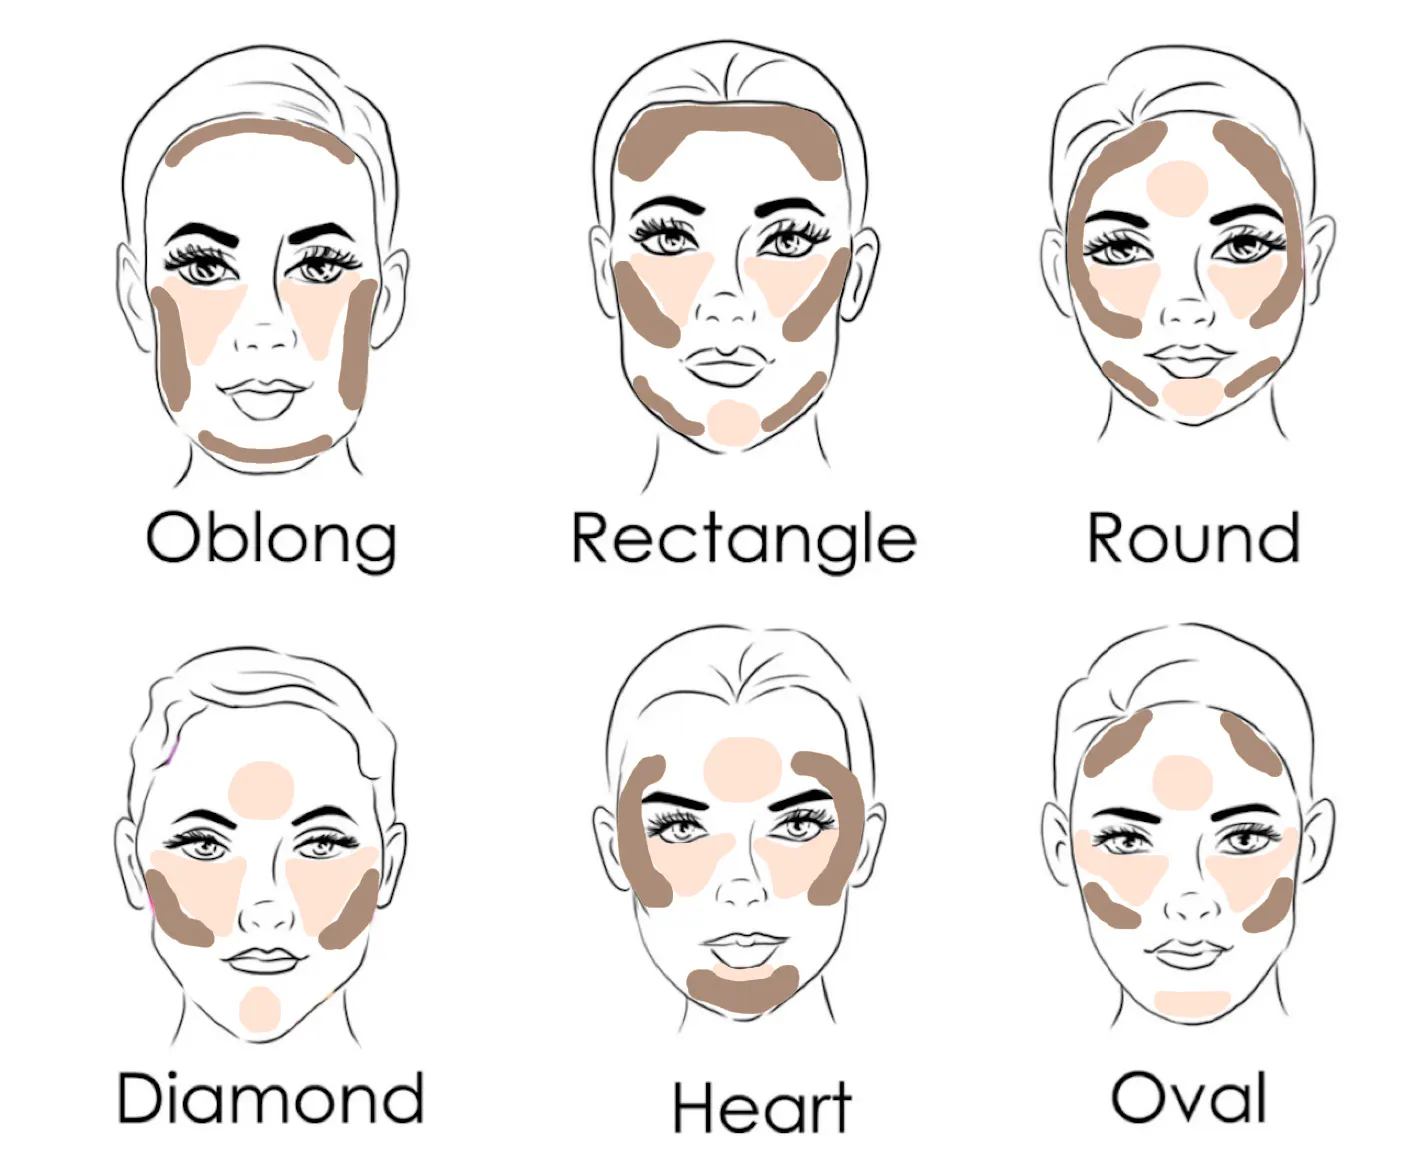
The key to expert-level contouring lies in customizing the placement based on your face shape. Here's how to contour for the most common face shapes:
Round Face
Goal: Create the illusion of length and angles
Where to contour: Along the sides of the forehead, under the cheekbones, and along the jawline
Blend: Upward toward the temples to lift and elongate the face
Oval Face
Goal: Maintain balance while enhancing bone structure
Where to contour: Slightly under cheekbones and lightly on the temples
Blend: Softly to avoid over-defining
Rectangle Face
Goal: Soften strong angles
Where to contour: Temples, below cheekbones, and along the jawline
Blend: In circular motions to soften harsh lines
Heart Face
Goal: Balance a wide forehead and a narrow chin
Where to contour: Sides of the forehead and temples, under cheekbones, tip of the chin
Blend: Inward toward the nose and downward on the chin to minimize prominence
Oblong Face
Goal: Shorten the appearance of the face
Where to contour: Hairline, under cheekbones, and bottom of the chin
Blend: Horizontally to create the illusion of width
Diamond Face
Goal: Minimize width of cheekbones
Where to contour: Cheek hollows and temples
Blend: Softly to avoid harsh definition
Tools You Need for Flawless Contouring
The tools you choose for contouring can make a significant difference in the outcome:
Angled contour brush: Ideal for cheekbones and jawlines
Blending sponge: Works well with cream or liquid products
Detail brush: Great for nose and eye contouring
Fluffy powder brush: Best for softening and diffusing lines
Clean your tools regularly to maintain precision and prevent product buildup that can interfere with blending.
Steps to Achieve a Professional-Looking Contour
Prep your skin: Start with a clean, moisturized face and apply primer.
Apply foundation: Even out your complexion.
Map your contour: Use a cool-toned product to mark the hollows of your cheeks, sides of your nose, jawline, and hairline.
Blend: Use a damp sponge or brush to diffuse harsh lines.
Set: Apply a translucent setting powder to lock in cream or liquid products.
Add dimension: Layer with a powder contour for longevity if needed.
Finish with highlight and blush: Add glow and balance to your sculpted look.
Set with spray: Use a setting spray to melt all layers into a skin-like finish.
Common Mistakes to Avoid When Contouring
Using the wrong undertone (too warm = looks muddy)
Applying too much product at once
Poor blending, leaving harsh lines
Contouring in poor lighting
Using shimmery bronzer as contour
Always check your makeup in natural light and go in with a light hand—it's easier to add more than to take away.
Contouring might seem intimidating at first, but with practice and the right techniques tailored to your face shape, it becomes an easy way to upgrade your everyday makeup. Focus on subtle definition rather than dramatic transformation, and remember: blending is everything. With a bit of practice and patience, you can contour like a pro and enhance your natural beauty with confidence.
As a leading cosmetics factory, we specialize in crafting on-trend
contouring makeup tailored to your brand’s vision. Contact us today to discuss your next product line!
 Ouqian
 Jul 09,2025